
We have upgraded our digital booth technology to make it easier for you to upload your company information on the digital floor plan and easier for our attendees to access that information on Farmfest.com. Welcome to 3e from EXPOCAD!
It is also important for exhibitors to update their digital profiles because the category information you provide will list your company in more than one place in the printed show program!
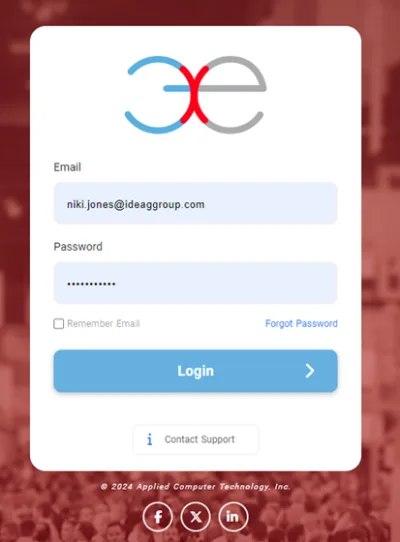
If you have already created your password, you can use the button to go directly to the login page. If you are logging in for the first time, skip the button and start with step one below.
Step by Step Tutorial for Updating Your Company Information
1. Check Your Email and Confirm via the Link Provided
You should have received an email from Dakotafest <noreply@expocad.com> inviting you to use 3e powered by EXPOCAD to update your digital booth profile. Click the link in the email to confirm your account.
If you don’t see the email from Dakotafest via Expocad, be sure you are designated as the primary contact for your company. If you are not, the person designated as the primary contact, likely received the email. If you are unable to track it down or you’d like your email added as admin, please contact IDEAg@IDEAgGroup.com to let us know.
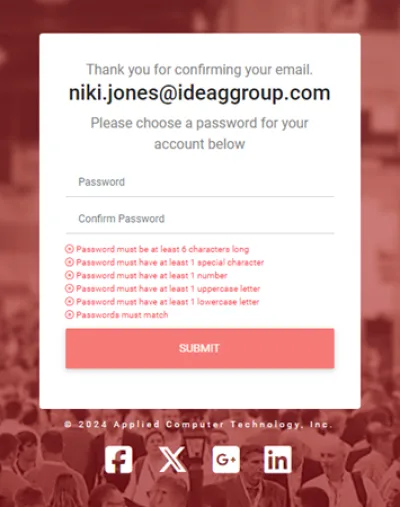
2. Set a Password and Enter your Dashboard
The system will ask you to set up a password. Once completed, you will be taken to the login screen. If you aren't taken back to log in, use this link: https://ideaggroup.expocad.com/Account/Login Enter your email and newly created password. Click the login button and you will see the dashboard screen for your digital booth.
3. Update your Company’s Details and Information
Use the three buttons at the top of the page to navigate through the area – ADMINISTRATION, DIRECTORY CONTENT, and VISITOR STATISTICS.
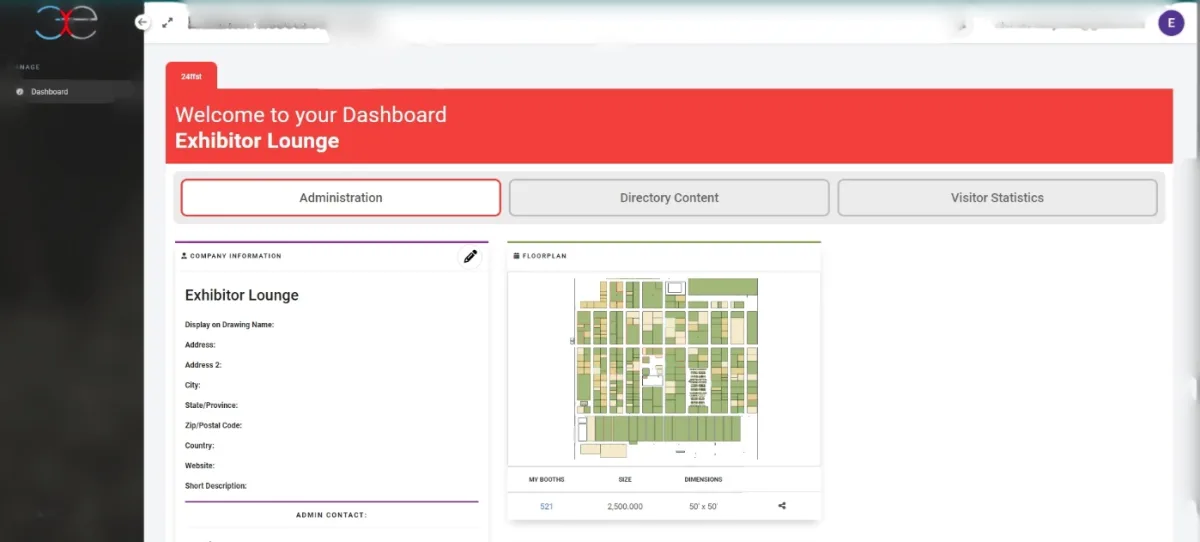
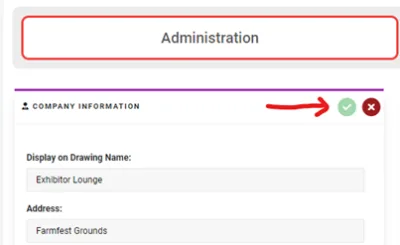
ADMINISTRATION
If it isn’t already, choose the Administration button at the top left of the dashboard. In this section, use the pencil icon to update your company’s location information and administrative contact. Use the checkmark icon to save your changes.
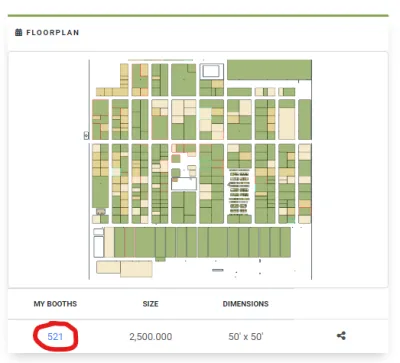
If you are the admin and not the representative on the ground at the show, that is ok. You’ll have an opportunity to update booth contact information on the next screen. In the Administration section, you have the ability to check your booth profile by clicking on your booth number in the floorplan image. To get back to your dashboard and continue editing, click the Dashboard tab on the top left margin of the screen.
DIRECTORY CONTENT
To update additional details of your digital booth, click the Directory Content button at the top middle of the dashboard. Use the pencil icon to update details and the checkmark icon to save your changes. Or, upload images or documents from your computer.
DON’T FORGET TO SELECT YOUR CATEGORIES! At the bottom of the middle column is the “Category Management” module. Use it to select the categories that your company or product best fits into. This information allows us to place your company both in the alphabetical listing in the show program and also in the Product Category section. If you don’t fill this out, you’ll only be listed once in the show program.
4. Review your Digital Booth and Make Necessary Updates
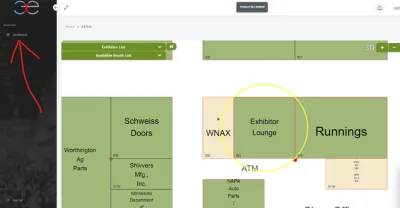
Use the blue “View Your Directory Page” button at the top of the screen to view your booth as an attendee to checkout your progress.
5. See How Many Visits your Booth Receives
Use the VISITOR STATISTICS section to check out the number of times your booth profile has been visited. Use the blue “Share Your Page” button at the top right of the screen to copy a link to your digital booth to send out to customers via email or share on social media.
And then you’re all set! Thanks for filling out your booth profile!